
Custom Golf Ball Marker Stencil: Precision Alignment for Every Putt
Learn how a simple stencil can transform your putting routine, helping you draw crisp alignment lines on your golf ball in seconds.
Why Use a Marker Stencil? A custom golf ball marker stencil lets you add clean, consistent alignment lines or personal marks to your golf balls. It’s an affordable tool that bridges the gap between a plain ball and a tour‑level putting setup – no artistic skill required.
What Exactly Is a Custom Golf Ball Marker Stencil?
At its core, a custom golf ball marker stencil is a thin, rigid template (usually metal or durable plastic) that you place over a golf ball. By running a permanent marker through the cut‑out grooves, you transfer precise lines, dots, or even initials onto the ball’s surface. Unlike freehand drawing, a stencil guarantees symmetry and a professional look every time. These stencils work with all major ball brands and can be used repeatedly – often for years – making them a staple in many golfers’ bags.
Many players already use a basic ball marker on the green, but a stencil lets you personalize the ball itself with alignment aids. That small line can help you square the putter face and choose a start line, a concept closely tied to putting alignment training.
Benefits of Using a Ball Marking Stencil
Improved Alignment
A straight, bold line on the ball acts as a visual cue to aim the putter face precisely. It simplifies green reading because you can align the line to your intended path.
Consistency
Every ball in your bag can be marked identically, removing the distraction of uneven or faded lines. Consistency builds confidence on the green.
Personalization
Add your initials, a lucky number, or a favorite symbol. A personalized ball stands out and can even serve as a thoughtful golf gift when given with a stencil.
Cost‑Effective
Instead of buying pre‑marked balls at a premium, a $15‑$25 stencil lets you mark dozens of budget‑friendly balls. It pays for itself quickly.
Types of Golf Ball Marker Stencils
Not all stencils are created equal. Understanding the differences helps you pick the right tool for your routine.
- Metal Stencils (Stainless Steel/Aluminum): Extremely durable, resistant to marker ink, and provide crisp lines. Many come with a magnetic back for secure placement. Ideal for frequent use.
- Heavy‑Duty Plastic Stencils: Lightweight, often cheaper, and available in fun colors. Best for occasional markers, though they may wear over time if used aggressively.
- Clamp‑On / Clip‑On Stencils: Feature a clamping mechanism that holds the ball firmly, eliminating slipping. A favorite for golfers who want a no‑shake marking experience.
- Multi‑Line Templates: Some stencils offer multiple slots – center line, side stamp, and triple track – giving you options without buying separate tools.
Regardless of type, a good stencil will fit snugly around a standard golf ball circumference (1.68 inches) and work with fine‑tip permanent markers. For those who enjoy a complete gear upgrade, these stencils pair beautifully with a fresh set of golf gear like a new putter or alignment mirror.
How to Use a Golf Ball Marker Stencil (Step‑by‑Step)
Dirt and oil can prevent the marker from adhering. Wipe the ball with a damp cloth or rubbing alcohol and let it dry completely.
For alignment lines, align the stencil’s central groove with the ball’s seam or equator. If your stencil is magnetic, let it snap into place. Press down gently to avoid shifting.
Use a fine‑point permanent marker (like a Sharpie). Ultra‑fine tips give razor‑sharp lines; standard tips are quicker but may bleed slightly. Black and blue are most visible, but red or green also work.
Hold the marker at a consistent angle and draw in one smooth motion. Do not press too hard – let the stencil guide the pen. If the line appears faint, a second light pass is better than one heavy stroke.
Remove the stencil carefully and allow 10‑15 seconds for the ink to set. If needed, wipe off any smudges with a tiny amount of alcohol on a cotton swab.
Pro Tip: Practice on a scuffed ball first. Once you’re confident, mark a dozen balls at once – it saves time and ensures a consistent look on the course. Combine this routine with putting tips for better results.
What to Look for When Buying a Stencil
With dozens of options on the market, focus on these features to get the best value for your money.
- Material & Build Quality: Stainless steel stencils resist bending and are easy to clean. Plastic models should feel rigid, not flimsy.
- Groove Width & Depth: Look for grooves about 1‑1.5 mm wide – they accept most marker tips without wiggling but aren’t so wide that lines become thick.
- Magnetic or Non‑Slip Backing: Magnets hold the stencil securely to the ball; silicone or rubber pads also work well and are often lighter.
- Alignment Features: Some stencils include a center notch or arrow to align with the ball’s logo, making repeated marks symmetrical.
- Portability: A compact stencil that fits in a pocket or clips to your bag is more likely to be used regularly. Many come with a carry case.
If you also like to keep your equipment personalized, check out our guide on personalized divot tools and magnetic ball markers – they complete a customized on‑course setup.
Do You Really Need a Stencil? (vs. Freehand Marking)
Freehand marking is quick, but it almost never delivers the same precision as a stencil. A stencil’s lines are dead straight and identical ball after ball, which matters when you’re working on putting alignment drills. For golfers who play tournaments or simply want to lower their handicap, the tiny investment in a stencil can lead to measurable improvement on the green. It’s also a fun way to bond with junior golfers – letting them pick their own design encourages practice.
Maintenance and Longevity
Taking care of your stencil ensures it lasts for hundreds of markings.
- After each session, wipe the stencil with rubbing alcohol to remove ink residue.
- Store it in a protective sleeve or case – metal stencils can scratch other items in your bag.
- Avoid bending metal stencils; even a small warp can misalign the lines.
For those who take their short game seriously, pairing a stencil with a high‑quality putting mat at home creates the ultimate practice environment.
Top Custom Golf Ball Marker Stencils to Elevate Your Game
⚠️ AFFILIATE DISCLOSURE: This website contains affiliate links. As an Amazon Associate, we earn from qualifying purchases. If you make a purchase through these links, we may receive a small commission at no additional cost to you. Read our full affiliate policy.

Tin Cup Golf Ball Marker Stencil - Premium Personalization Tool for Golfers - Custom Design Ball Marker - Golf Accessories Gift for Men and Women- Made in The USA (Wilson)

Custom Golf Ball Stencils

Tin Cup Golf Ball Marker Stencil - Premium Personalization Tool for Golfers - Custom Design Ball Marker - Golf Accessories Gift for Men and Women- Made in The USA (Trail Blazer)
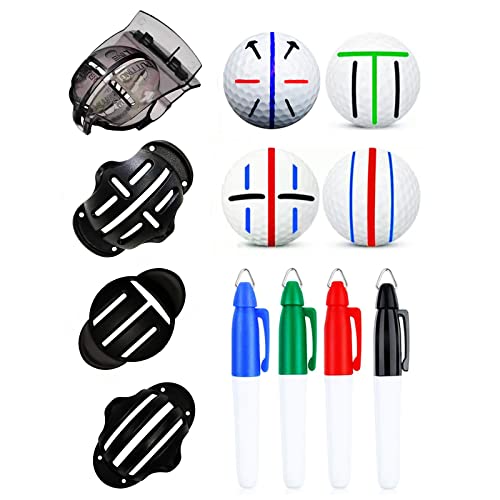
8 Pack Precision Golf Ball Marker, Upgrade Golf Accessories, 4 Golf Ball Marking Stencils and 4 Colors Golf Ball Markers, Golf Ball Line Marker Tool, Golf Ball Alignment and Identification Tool
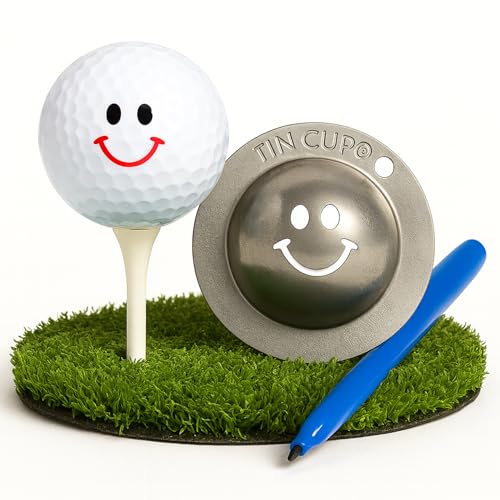
Tin Cup Golf Ball Marker Stencil - Premium Personalization Tool for Golfers - Custom Design Ball Marker - Golf Accessories Gift for Men and Women- Made in The USA (Groovy)

Tin Cup Golf Ball Marker Stencil - Premium Personalization Tool for Golfers - Custom Design Ball Marker - Golf Accessories Gift for Men and Women- Made in The USA (Top Gun)

Tin Cup Golf Ball Marker Stencil - Premium Personalization Tool for Golfers - Custom Design Ball Marker - Golf Accessories Gift for Men and Women- Made in The USA (Divine Intervention)
