The Complete Guide to Club Regripping
Master the essential skill of regripping your golf clubs. Learn when to replace worn grips, how to choose the perfect size and material, and follow our professional step-by-step instructions to restore feel and control to every club in your bag.
LEARN WHEN TO REGRIPWhy Grips Matter Most: The grip is your only connection to the club. Worn, slick, or ill-fitting grips are the most overlooked cause of inconsistent shots, excess tension, and lost distance. A fresh set of properly sized grips, costing around $75–$150 for a full set, can transform your performance more dramatically than a new $500 driver.
Why Regripping is Non-Negotiable for Every Golfer
Golf grips are a consumable component, much like tires on a car. Over time, UV exposure, sweat, dirt, and friction degrade the rubber or synthetic compounds. This leads to a hardened, shiny surface that forces you to squeeze tighter, creating tension in your hands, wrists, and forearms. This tension severely restricts your swing speed and release, costing you distance and accuracy.
Most teaching professionals recommend regripping your clubs at least once a year, or every 40–50 rounds, whichever comes first. If you practice frequently at the driving range, that timeline shortens considerably. Ignoring your grips can lead to ingrained swing flaws as your body subconsciously compensates for the lack of traction.
The Performance Cost of Old Grips
When a grip loses its tackiness, you lose feel. This is disastrous for your short game, where touch and feedback are paramount. A fresh grip allows you to hold the club with a lighter, more consistent pressure, promoting a fluid swing and a square clubface at impact. If you are working on swing fundamentals, the right grips are the foundation upon which everything else is built.
5 Clear Signs It's Time to Regrip Your Clubs
- Shiny or Glazed Appearance: The grip loses its matte finish and begins to reflect light, indicating the surface has hardened and sealed over.
- Visible Wear and Tear: Look for cracks, thinning areas, or completely smooth patches, especially under your left hand (for right-handed golfers) where the most pressure is applied.
- Loss of Tackiness: The grip feels slick, even after cleaning. A good test is to lightly rub your thumb across the grip; if it slides with no resistance, the grip is dead.
- Frequent Slipping: You feel the club twist in your hands on off-center hits, or you're subconsciously tightening your grip at address to compensate.
- Incorrect Size: If you experience finger pain digging into your palm or feel you can't get your hands through the shot, your grip size is likely wrong, and it's a perfect opportunity to fix it during regripping.
How to Choose the Perfect Golf Grip
Selecting a new grip is not a one-size-fits-all decision. The right grip depends on your hand size, playing conditions, and personal feel preference. An undersized grip can cause excessive hand action and hooks, while an oversized grip can restrict hand release and promote slices.
Grip Size Matters
The standard industry guideline uses your glove size and hand measurements. A proper fit allows the middle and ring fingers of your top hand to just barely touch the palm pad. General recommendations start at a standard size, often moving to midsize for glove sizes larger than a men's medium-large. Many players are now discovering the benefits of the oversized putter grip for their flatstick, which often translates to a preference for slightly larger grips throughout the set. Don't guess; a custom club fitting session often includes grip size analysis.
Grip Material and Texture Comparison
| Material | Feel & Feedback | Best For | Typical Price |
|---|---|---|---|
| Rubber | Firm, durable, excellent feedback. The classic standard, like the Golf Pride Tour Velvet. | All-weather performance, players who want maximum clubhead feel. | $5–$10 per grip |
| Multi-Compound (Corded) | Firm cord fabric in the upper hand for traction, softer rubber in the lower hand. Very aggressive texture. | Hot, humid climates, golfers who sweat heavily and desire maximum control. | $10–$14 per grip |
| Wrap-Style | Soft, tacky, spongy feel. Greatly reduces vibrations and shock, excellent for arthritic hands. | Senior players, golfers with joint pain, or those seeking the plushest feel. A great match for senior golf clubs. | $6–$11 per grip |
| Hybrid/Synthetic | Combines shock absorption with a softer texture, often infused with tacky additives. | Players seeking a balance of comfort and performance without the firmness of pure rubber. | $7–$12 per grip |
DIY Regripping vs. Professional Installation
You have two main paths: invest in a DIY kit for $20–$35 and learn the skill in under an hour, or pay a professional shop a labor fee of $2–$5 per club. A full set of 13 clubs professionally regripped with quality grips like Golf Pride MCCs will cost between $150 and $220. Doing it yourself with the same grips reduces the cost to around $130–$175.
While the savings are substantial, the real benefit of DIY is control. You can experiment with different layering of grip tape to perfectly dial in your size, a process that can refine your equipment setup to tour-level precision. Our step-by-step guide below makes the process foolproof, even for complete beginners.
Step-by-Step DIY Club Regripping Guide
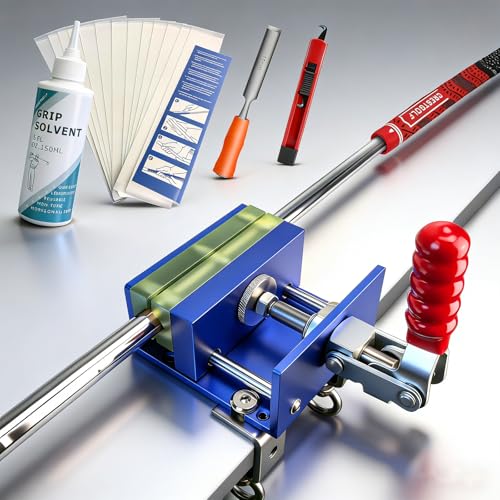
Follow this professional process to regrip your clubs at home. You'll need a grip kit including a hook blade, grip tape, solvent, and a vise clamp with a rubber shaft protector.
-
Remove the Old Grip and Tape
Secure the club in the vise clamp. Using a hook blade in a utility knife, carefully cut from the bottom of the old grip up toward the grip cap, slicing away from your body. Once split, peel the old grip off. Then, peel or scrape away all the old grip tape underneath, exposing the bare shaft. If a graphite shaft is involved, like on your driver or fairway woods, use extreme caution to avoid gouging the fibers.
-
Apply New Double-Sided Grip Tape
Starting from about a half-inch above the butt end of the shaft, wrap the entire grip area with a continuous, spiral wrap of high-quality double-sided tape. Overlap the tape by half its width to ensure full coverage. Remove the backing paper to expose the sticky outer layer. The amount of tape build-up can fine-tune your shaft feel and grip thickness.
-
Lubricate and Slide on the New Grip
Place a tee in the vent hole at the butt end of the new grip. Generously flood the inside of the grip with grip solvent. Pour the used solvent from inside the grip over the entire length of the newly taped area. In one swift, continuous motion, push the grip onto the shaft until the butt end is flush against the edge. Do not stop or hesitate, as the solvent activates the tape's adhesive within seconds.
-
Align and Set
You have about 30-60 seconds to align the grip perfectly. Sight down the clubface to ensure any grip logos or alignment aids are square to the target. Make your adjustments quickly but gently. Once aligned, set the club aside and do not touch it for at least 2-3 hours to allow the solvent to fully evaporate and the bond to cure.
Extending the Life of Your New Grips
To get the maximum lifespan from your new investment, simple maintenance is key. Wash your grips every 4-5 rounds with warm, soapy water and a stiff nylon brush. This removes oils and dirt that clog the pores and restore tackiness. Rinse thoroughly and towel dry. Store your clubs indoors, never in a hot car trunk, as extreme heat will rapidly accelerate the degradation of the rubber. Using a wet and dry golf towel on course to keep grips clean during the round is another great habit to adopt, especially when paired with quality golf gloves for all-weather traction.